
St Clements Custards

When it comes to quick, easy and elegant desserts, my St Clements Custard is pretty much top of the list. This citrus scented baked custard makes the perfect ending to any elegant meal and a heart shaped ramekin or bowl makes it just right for Valentine’s Day. Baked custard is basically the crème in crème brûlée but without the brûlée. This dessert reminds me a bit of Panna Cotta as well – without all the hard work!
There’s a very old traditional British nursery rhyme that begins “Oranges and lemons say the bells of St Clement’s”. This led to orange and lemon served together being referred to as “St Clement’s” here in England. St Clement’s Cakes contain both orange and lemon juice and rind. If you order a St Clement’s in a pub, you will be served orange juice mixed with fizzy lemonade. Hence my custard with its refreshing citrus hit. Ordinary oranges work beautifully in St Clements Custards but if blood oranges are in season as they are at the moment they make it extra special.

The reason this dessert is so gorgeous and creamy is the way it is cooked – in a Bain Marie. Don’t be alarmed, you don’t have to buy yet another piece of kitchen equipment – Bain Marie simply refers to a hot water bath created in the oven. You need a large, fairly deep pan (or pans) big enough to hold four to six heat safe ramekins or small bowls. I use roasting dishes. Two of them will fit in my oven at once and I put three heart shaped ramekins in each. Fill the roasting dishes with boiling water to come half way up the ramekins or bowls and then pour the custard mixture into the ramekins. Carefully put the roasting dishes in the oven and bake. Bain Marie is much simpler than it sounds!

Tips For Making St Clement’s Custards
My St Clements Custards are incredibly easy but there are some important things to remember.
Make sure the eggs are at room temperature before you begin.
Be sure to use fresh citrus fruit. The rind adds so much flavour – and the juice in those squeezy plastic lemons the grocery stores sell just doesn’t cut it in this recipe.
Don’t over-whip the mixture or the bubbles will cook into the custard. It still tastes good that way but it doesn’t look as elegant.
This recipe will make four large servings or six smaller ones. If you make four servings they will take longer to cook than six.
Make the St Clement’s Custards no more than a couple of hours before you want to serve them and cool to room temperature before serving. Serve at room temperature. You can store leftover custard in the fridge but it doesn’t benefit its appearance. And while St Clement’s Custard does taste nice fridge cold, it is much more delicious at room temperature.
That’s it! It probably took you more time to read this post than it will to mix up my St Clement’s Custards. Twenty minutes in the oven and a half an hour or so to cool and this elegant and delicious dessert can be on your table!
St Clement’s Custards Printable Recipe
- 6 large fresh eggs (cage free, free range or organic)
- 1⅓ cups white sugar, caster sugar if possible but granulated is fine
- the zest of one lemon and one orange plus more orange rind to garnish if desired
- 2 tablespoons fresh lemon juice
- ¼ cup fresh orange juice
- 1 cup double (heavy) cream (not whipping cream)
- chocolate and white chocolate curls to garnish (optional)
- Preheat the oven to 325°F (160°C).
- Boil the kettle.
- Put the eggs, sugar, lemon juice and zest and the orange juice and zest in a large mixing bowl.
- Beat until well combined but not too bubbly.
- Add the double (heavy) cream and beat in. Again, be careful not to make the mixture too bubbly.
- Set the mixture aside to rest while you prepare the Bain Marie.
- Sit 4 or 6 heat proof ramekins or bowls in a large roasting pan or pans.
- Being very careful not to splash any water into the ramekins, pour the water from the kettle into the larger pan(s) so that it comes half way up the ramekins.
- Pour the custard carefully into the ramekins or bowls.
- Using oven gloves, transfer the roasting pan(s) to the oven, being careful not to splash water into the custards on on yourself.
- Bake for 20 to 25 minutes until the custard firms up a bit and the tops just begin to take on a golden tinge. Watch them carefully towards the end of the cooking time or they will burn.
- When the custards are cooked, remove the roasting pans from the oven, being careful not to splash any hot water on yourself or in the custards. Place the roasting pans on a heat proof surface.
- Using oven gloves, remove the ramekins or bowls from the roasting pans, dry the bottoms and place on a heat proof surface to cool to room temperature.
- When cool, garnish with orange rind and chocolate curls if desired.
- Serve at room temperature within a couple of hours if possible.
Why not try my Fruit Brûlée, another easy Valentine’s Day dessert?
The post St Clements Custards appeared first on April J Harris.
More useful information.....
- Drink THIS First Thing in the Morning!
- Are “Natural” Sugars Any Better Than Refined White Sugar?
- All the Favorite Desert Recipes (Brownies, Cupcakes, Custards, Soufflés, Pies, Muffins, Cookies, Tarts, Crème Brûlée and more!
- The Most Sumptuous Candy Recipes that Won’t Spike Your Blood Sugar or Pack on the Pounds!

Blackberry Apple Cake Recipe
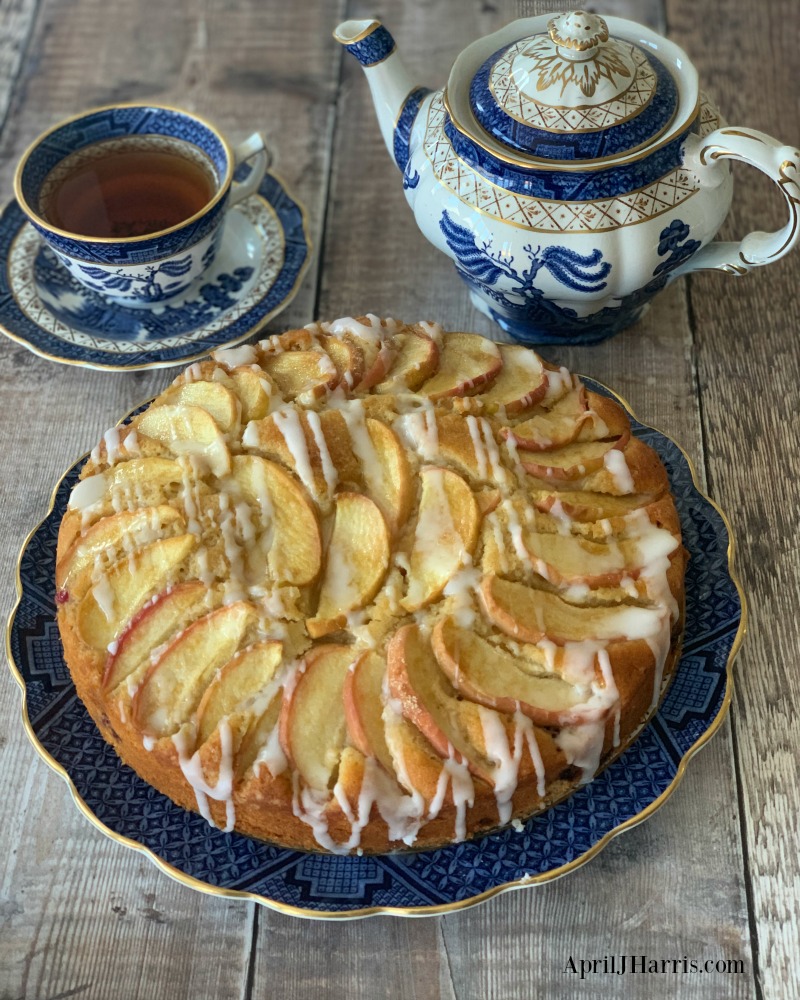
My Blackberry Apple Cake is a lightly spiced cake is studded with fresh blackberries and topped with red-skinned apples baked to tender perfection.

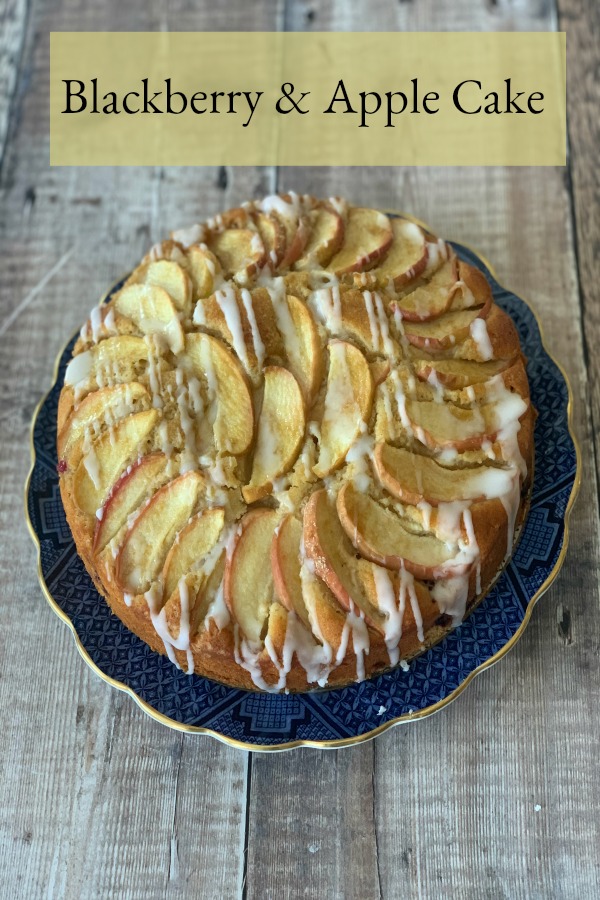
Crisp, sweet apples and tart, tangy blackberries are a classic combination. My Blackberry Apple Cake showcases this pairing at its best. The moist, lightly spiced cake is studded with fresh blackberries and topped with red-skinned apples baked to tender perfection. An easy glaze gives this cake a festive air, making it perfect for any celebration or just for everyday treats.
Love baking with fruit? Check out these yummy recipes!
An Easy To Make Recipe That Is Sure To Impress
One of the things I love about this Blackberry Apple Cake is just how easy it is to make it look gorgeous. Like my Apple Butterscotch Cake, the decorations are really effective but incredibly simple to do. A few scattered apple slices, a drizzle of glaze, a scattering of sugar and spice, and you’ve got something pretty enough for the fanciest cake table.
Top Tips for Making Blackberry and Apple Cake
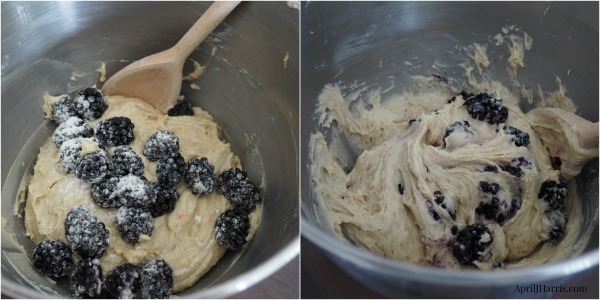
My top tip – be sure to toss the blackberries lightly in the 1 teaspoon flour as recommended. This will keep them from sinking to the bottom of the cake. Fold them in really gently with a wooden spoon to avoid too many purple streaks through the batter. At this point, the cake is well beaten together, so you can go really gently here.
I like to use a loose bottomed cake pan to make many of my cakes and this Blackberry Apple Cake is no exception. There’s no heart in your mouth cake-flipping moment where you worry about all your hard work breaking or sticking to the pan. Simply butter the pan before use. Then when the cake has cooled for about twenty minutes in the pan you can just run a dinner knife around the edges and carefully pop the bottom up and out from the sides.
Finish cooling the cake on a wire rack with the bottom of the pan still intact – I often serve it with the bottom still attached as well. If you prefer though, it’s easy to run a pallet knife between the cake and the bottom of the pan when it is cool and gently slide the cake off on to a rack.

I love Blackberry Apple Cake sliced with coffee for breakfast, topped with whipped cream for a ladies’ luncheon, with a cuppa and a drizzle of cream for afternoon tea, or served with a big scoop of good vanilla or salted caramel ice cream for dessert. Easy, versatile, pretty and delicious too. What more could you ask for?
Blackberry Apple Cake Printable Recipe

- For the cake:
- ½ cup unsalted butter, softened
- ¼ cup packed brown sugar
- ½ cup granulated or caster sugar
- 2 large eggs, at room temperature
- 1 teaspoon vanilla
- 2 cups plus 1 teaspoon all purpose (plain) flour
- 2½ teaspoons baking powder
- ¼ teaspoon salt
- 1 teaspoon ginger
- ½ teaspoon cinnamon
- ¾ cup plain or vanilla yogurt
- 1 cup blackberries
- For the topping:
- 1 large red-skinned apple
- 2 tablespoons demerera sugar (or use granulated or caster sugar if demerera is not available)
- ½ teaspoon ginger
- For the glaze:
- ½ cup icing sugar (confectioner's sugar)
- ½ teaspoon ginger
- 1 to 2 tablespoons water
- Preheat the oven to 350°F (175°C, 165°C for fan ovens).
- Butter an 8 inch round loose-bottom cake pan.
- Cream the butter and sugars together in an electric mixer until they are light and fluffy.
- Beat the eggs into the creamed mixture.
- Sift together the 2 cups flour, baking powder, salt, 1 teaspoon ginger and ½ teaspoon cinnamon.
- Add these dry ingredients to the creamed mixture, alternately with the yogurt.
- Toss the blackberries in the 1 teaspoon of flour.
- Remove the bowl from the mixer and fold the flour tossed berries into the batter very gently using a wooden spoon.
- Pour the cake mixture into the prepared pan, coaxing the batter right to the edges of the pan and smoothing the top with a knife.
- Core, quarter and thinly slice the apple. (Do not peel.)
- Arrange the apple slices on top of the cake in a circular formation.
- Combine the demerera sugar and ginger together and sprinkle over top of the apples.
- Bake for 25 to 30 minutes or until a skewer inserted in the centre of the cake comes out clean.
- Cool the cake in the pan for 20 minutes before carefully removing the sides of the pan and cooling completely on a wire rack. I don't recommend removing the bottom of the cake pan at this stage. (When the cake is absolutely cool, you can or run a knife between the cake and the base and gently slide it off or you can just leave the bottom of the pan on the cake and put the whole thing on a plate to serve.)
- When the cake is completely cool, mix together the icing sugar and ginger, and add enough of the water to make a smooth, pourable glaze.
- Drizzle over the cake and allow to set before slicing.
Love to Bake with Fruit? Check out these yummy recipes!
Gluten Free Blackberry and Apple Scones
Chocolate and Blueberry Pudding Cake
The post Blackberry Apple Cake Recipe appeared first on April J Harris.
More useful information.....
- Drink THIS First Thing in the Morning!
- Are “Natural” Sugars Any Better Than Refined White Sugar?
- All the Favorite Desert Recipes (Brownies, Cupcakes, Custards, Soufflés, Pies, Muffins, Cookies, Tarts, Crème Brûlée and more!
- The Most Sumptuous Candy Recipes that Won’t Spike Your Blood Sugar or Pack on the Pounds!
Mini Turtle Cheesecakes by The Pioneer Woman
I love cheesecake, but sometimes I can’t be bothered to make a big, honking full-sized one. I don’t know what the mental block is, but if I have the idea “Hey! I think I’ll make a cheesecake!” I immediately get really tired and want to get back in bed. I think it’s partly to do with the fact that a full-sized cheesecake is a living, breathing thing, and while I can usually avoid winding up with a big crack down the middle, sometimes a cheesecake does what it wants to do. In addition, a full-sized cheesecake takes so long to chill properly, and by the time you can actually cut a slice and enjoy it, you have now aged 27 years.
As I said, I just want to get back in bed.
So mini cheesecakes are where I live! They’re simpler, provide more immediate gratification (relatively speaking) and you can freeze them and just pull out what you need when you need it.
And they don’t make me tired. Sold!
 First, make the chocolate cookie crust. Add chocolate graham crackers to a food processor. (Or you can use Oreos!)
 Add a little sugar…
 Then pulse the crumbs…
 Until they’re really fine.
 Keep pulsing while you drizzle in melted butter.
 This makes the crumbs nice and moist.
Oh, and buttery!
 Line a couple of muffin pans with paper cups, then add crumbs to each one. You need about 2 tablespoons of crumbs in each cup.
 Use your fangers or the bottom of a 1/4 cup measure to pack them tightly in the cups.
 Now just set these aside; no need to bake ’em!
 Next up: Make the cream cheese filling! That’s softened cream cheese…
 Sugar…
 And eggs.
 Oh! And vanilla!
 Beat this until it’s totally smooth…
 Then (this is where things really go off the rails) drizzle in some jarred salted caramel. (If you can’t find salted caramel sauce, you can just use regular caramel sauce with a little salt added.)
 Mix this in, scraping the sides of the bowl and trying really hard not to dive in and eat this with a spoon. Just remember everything your mama taught you about patience being a virtue!
 Divide the batter equally among the muffin cups.
 It should work out to be roughtly 3 tablespoons of batter per cup. Give or take a gallon.
Now put these into a preheated 350 degree oven and bake them for about 15 to 17 minutes, until they’re set.
 Let them cool for a bit, then pop the pans into the fridge to chill completely, about 2 hours or so. (Or you can make these and keep them in the fridge overnight if you have a life to go live!)
 When the cheesecakes are chilled and you’re ready to finish them, make a luscious and easy ganache: Add chopped semisweet chocolate to a bowl…
 Then pour over hot heavy cream…
 And let it sit for a couple of minutes.
 Once the chocolate has started to soften, start whisking it slowly…
 And keep going until the mixture is smooth and perfect. This is a slightly thick ganache; you can add a little more cream if you want it to be a little thinner.
 Add a little ganache to the tops of the chilled cheesecakes and spread it to even it out.
 Lightly press a pecan half in the center…
 Then sprinkle mini chocolate chips all over.
 The straw that broke the camel’s back is a little more salted caramel sauce on top! Don’t try to be neat about it; if it gets on the paper cup, great. Life is beautifully messy.
 You can freeze these in the finished form, then just pull them out and let them thaw. Or you can chill them in the fridge and serve them later in the day.
 Or…
Or…
 You can just dive in right now.
As you can see, that’s exactly what I did.
Enjoy these, friends!
More useful information.....
- Drink THIS First Thing in the Morning!
- Are “Natural” Sugars Any Better Than Refined White Sugar?
- All the Favorite Desert Recipes (Brownies, Cupcakes, Custards, Soufflés, Pies, Muffins, Cookies, Tarts, Crème Brûlée and more!
- The Most Sumptuous Candy Recipes that Won’t Spike Your Blood Sugar or Pack on the Pounds!
Old Fashioned Christmas Pudding Recipe

Christmas Pudding is an integral part of British Christmas celebrations. You may have seen illustrations in the classic novel, ‘A Christmas Carol’ by Charles Dickens, depicting a flaming pudding being carried proudly to the table. Similar imagery is still used in advertisements in the UK today. Christmas pudding is still a seriously big deal over here.
What is Christmas Pudding?
Traditional Christmas Pudding is more like a heavy cake than what you might think of as a pudding. It is made with raisins and other dried fruit and flavoured with brandy or stout (a very dark beer). Sometimes it contains nuts as well. My husband’s family recipe does not contain nuts – and woe betide anyone who tries to add them. Believe me, I know!
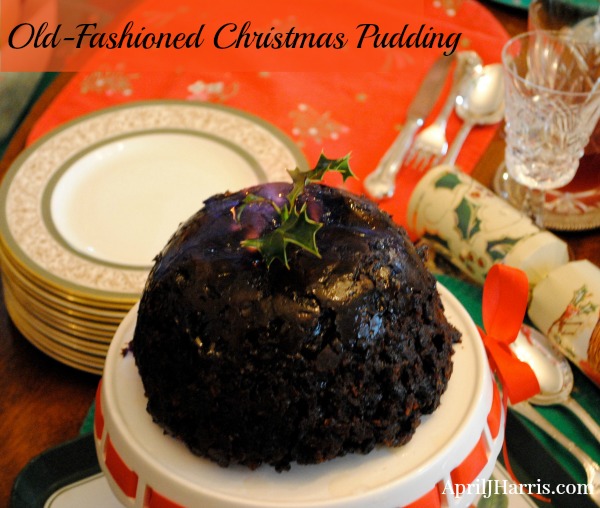
At the end of Christmas lunch or dinner, the pudding is garnished with holly and doused in brandy which is then lit. Not only does this create a spectacle, it also flavours the pudding.

After the flames go out, the pudding is sliced in small slices (a little goes a long way as it is very rich). It is then served with brandy custard, brandy butter or cream. (Please note, holly is poisonous, and should be removed before cutting or serving. Even better, use some artificial holly instead!)
Stir Up Sunday
Christmas pudding is traditionally made a few weeks before Christmas, often on Stir Up Sunday. It is then stored in a cool place for the flavours to develop. This year Stir Up Sunday is Sunday 26th November. While the day is just tradition, the pudding does need at least two or three weeks to mature.
Everyone in the family is meant to have a go at stirring the pudding mixture. Many families will have a recipe they use year on year, and our family is no different. The recipe we use comes from my husband’s late step-Grandmother, Dorothy Harris, whom we called Nana. It’s about as authentically Victorian as you can get. Let me tell you why.
Looking for more Christmas treats and recipes?
Authentic Victorian Christmas Pudding
Before she married my husband’s Grandpa Joe, Nana was head cook in a stately home. Joe became a widower when my husband’s father was just 3. Nana brought a steadying presence to the then motherless household, along with all her recipes from her days as head cook. Although this would have been in the 1930’s, we know Nana inherited the recipe from the previous (long-serving) head cook – so it must be a pretty close approximation of the pudding Charles Dickens describes in ‘A Christmas Carol’.
The original recipe makes 4 one pint – or 2 two pint – puddings, and called for a pound of most of the ingredients. When I make it, I halve the recipe for ease, and this is the recipe I’ve shared below.
A one pint pudding will easily serve 6 to 8 people, perhaps more if they have eaten a lot of Christmas dinner. If there are only a few of you I suggest you choose the option of two smaller one pint puddings as they do taste better if they are only re-steamed once.
The Christmas Pudding Contest
When Nana and my Mother-in-Law were alive, every year there was a Christmas Pudding Contest, initiated by my late Father-in-Law. Nana and my Mother-in-Law would both make the same recipe – the one I’m sharing with you today – and we were all given some of each in a blind taste test. Then we had to say which we thought tasted best. I found it incredibly stressful, particularly as Nana grew frail. My Mother-in-Law would try desperately to surreptitiously signal us as to which pudding Nana had made so we would say it was best. She had to do this without my Father-in-Law seeing, as he took the competition very seriously!
Tips for Making Old-Fashioned Christmas Pudding
There are some ingredients in Christmas Pudding which may be unfamiliar. Suet is shredded animal fat but there are also vegetarian versions available. Suet isn’t widely available outside the UK, but I have heard that you can use grated frozen butter or shortening instead. I haven’t tried this but cannot see why it wouldn’t work.
Mixed spice is a combination of fragrant spices like cinnamon, ginger, nutmeg and coriander. If you can’t buy it locally, you can make it yourself.
It’s important to wrap the pudding properly for steaming and storage. The method is described in the recipe below, but here’s a helpful video to make it even more clear.
Our Family Christmas Pudding Recipe
This recipe is challenging but definitely worth it! It’s fun to make on a rainy day, and a great history and cooking project for kids. I like to wrap the presents or do some decorating on the day I make the pudding so I’m close by but doing something productive.
The fruit needs to be soaked over night, and someone has to keep an eye on the pudding for the whole eight hours it steams.
It is, however, incredibly satisfying to make. I had such a proud moment when I carried the first Christmas pudding I made to the table. If you really want to experience what Christmas in England is like, there just has to be Christmas pudding.
Old-Fashioned Christmas Pudding Printable Recipe
- half a lemon, rind and juice
- 8 ounces currants
- 8 ounces raisins
- 8 ounces sultanas
- 3 ounces brandy
- half an orange, juiced
- 8 ounces suet
- 8 ounces moist brown sugar
- 8 ounces cooking apples, peeled and grated (at the last minute or they will go brown)
- 4 ounces mixed peel (also known as candied peel, this is widely available in the UK and Europe and available in the baking aisles of some North American grocery stores)
- 4 ounces flour
- 4 eggs
- 4 ounces fresh white breadcrumbs
- ½ teaspoon salt
- ½ teaspoon mixed spice
- Soak the currants, raisins and sultanas in the brandy, lemon and orange juice overnight.
- In the morning, in a seriously large bowl, mix the suet, flour, sugar, salt, spices, mixed peel, breadcrumbs, apples and eggs with the soaked fruit and any juice/liquor remaining in the bowl.
- All the ingredients should be included at this point. Mix thoroughly with a wooden spoon until completely combined.
- Grease one 2 pint pudding basin or 2 one pint pudding basins.
- Fill to about three quarters full with this mixture.
- To wrap the pudding for steaming you need to lay a sheet of aluminium foil over a sheet of greaseproof or waxed paper.
- Pick up both and make a pleat down the centre. Put this on top of your pudding bowl and wrap round firmly.
- Then use a long piece of string to tie the paper and foil tightly round the bowl, leaving a couple of nice long ends of string.
- Bring the extra string back up over top of the bowl and tie it under the string on the other side to make a handle so you can get the pudding out of the steamer easily.
- Trim round the edges of the paper and foil with scissors to ensure that none of it drips into the water you will put round for steaming or it will seep into the pudding and ruin it.
- You need a large steamer or saucepan for each pudding bowl – it needs to be much larger than the bowl itself. Place a small heatproof saucer upside down on the bottom of each saucepan, and place your prepared pudding bowl on top of the saucer.
- Carefully fill the edges of the saucepan with water about half way up the pudding bowl. Put the lid on the saucepan.
- Bring the water to a slow boil so the pudding can steam gradually. You will need to top up the water very regularly (sometimes as often as every forty-five minutes or so) so that the pudding does not boil dry. If it does, the saucer and pudding bowl will break and all will be lost.
- After eight hours of steaming, remove the saucepan from the heat and let it cool down a bit before carefully removing the pudding from the saucepan using the string handle.
- It’s good to have a tea towel close by as the pudding bowl will be wet.
- Dry the bowl off, remove the paper, foil and string and sit the pudding in its bowl on a heat proof surface to cool down.
- When the pudding and bowl are completely cool, remove the greaseproof paper and foil and then tie a fresh piece of greaseproof paper and foil over them just as before.
- The pudding improves with age, so store in a cool place away from draughts until Christmas. (The top of a cupboard works well.)
- Four hours before your Christmas dinner, repeat the steaming process. To serve the pudding, carefully remove it from the pudding basin (it will be very hot) by inverting on to a serving plate.
- Traditionally the pudding is flamed, but this step is optional. If you want to flame your Christmas pudding, just pour a small amount (a couple tablespoons) of brandy or vodka over the pudding and light it with a match (be careful and make sure kids stay well out of the way!)
- When the flames go out, serve the pudding in small slices with brandy butter, cream or custard.
More Christmas Recipes
Orange Gingerbread Crinkle Cookies
The post Old Fashioned Christmas Pudding Recipe appeared first on April J Harris.
More useful information.....
- Drink THIS First Thing in the Morning!
- Are “Natural” Sugars Any Better Than Refined White Sugar?
- All the Favorite Desert Recipes (Brownies, Cupcakes, Custards, Soufflés, Pies, Muffins, Cookies, Tarts, Crème Brûlée and more!
- The Most Sumptuous Candy Recipes that Won’t Spike Your Blood Sugar or Pack on the Pounds!